Mixing Process
I do all of my mixing in Reaper, with a hybrid digital/analogue approach.
Very often, I will work with artists who have done their recording, production, and/or programming in a different workstation. Fortunately, most DAWs make it easy to export and interface with other DAWs, so no matter where your production started, collaborating has never been easier.
To mix your song, I require all multitrack stems separated and delivered in two ways: with effects processing (Processed), and dry, with no effects processing (Unprocessed). If there are highly specific processing elements that are integral to the production, such as a sidechain compression scheme or a rhythmic delay, please note these to me.
I also request a rough mix of the song. This helps give me an impression of what you consider foreground and background elements, and lets me know if I’m either missing elements or have parts that were supposed to be muted.
Last but not least, please note to me the BPM of the song.
I’ve made some helpful walk-throughs for exporting stems from common DAWs in my preferred formatting below:
Exporting from Pro Tools
1) Export your rough mix, so I have an idea of the balances that you’ve been working with. This tells me what parts you consider foreground/background, and will also let me know if I’m either missing any elements or have a stem that shouldn’t be in the mix.
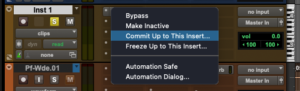
2) Make sure that all MIDI instruments are committed as audio. For most instruments, simply right click the plug-in itself, and click “Commit up to this insert…” then click Commit: Track. For multi timbral instruments such as drum kits, you’ll need to route the outputs of each individual sound to its own track, which is dependent on the plug-in being used. Typically you can set the inputs of new audio tracks to the plug-in outputs and route the sounds from there.
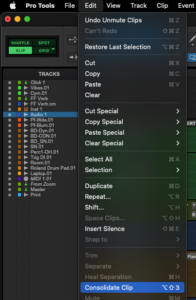
3) Select the length of your project in the timeline, and select all tracks. Make sure the timeline selection encompasses all of the audio that you want to include and all of the Aux sends. Hit alt+shift+3, or navigate to Edit>Consolidate Clip. This should create all of the Unprocessed stems that I’ll need in the Audio Files folder
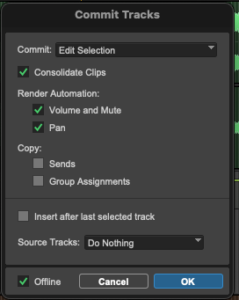
4) With the same selection, hit alt+shift+C, or navigate to Track>Commit…. Select Commit: Edit Selection, and check off Consolidate Clips, Volume and Mute, Pan, and Offline. This should create all of the Processed stems that I’ll need, again in the Audio Files folder.
5) Navigate to the Audio Files folder in Finder/File Explorer, and sort by most recently edited. This should show the files that you just consolidated and committed at the top. Create folders for the Processed and Unprocessed stems, and put the new files in the correct folders.
6) You’re done! Please put the rough mix, Processed folder, and Unprocessed folder into a clearly labelled master folder with the song’s name and BPM, and send the whole bundle however you prefer!
Exporting From Logic
1) Export your rough mix, so I have an idea of the balances that you’ve been working with. This tells me what parts you consider foreground/background, and will also let me know if I’m either missing any elements or have a stem that shouldn’t be in the mix.
2) Remove all processing from your master fader.
3) Select the length of your project in the timeline, then go to File>Export>Bounce All Tracks. It’ll bring you to the export window in the screenshot below. I ask that you export both processed and unprocessed stems.
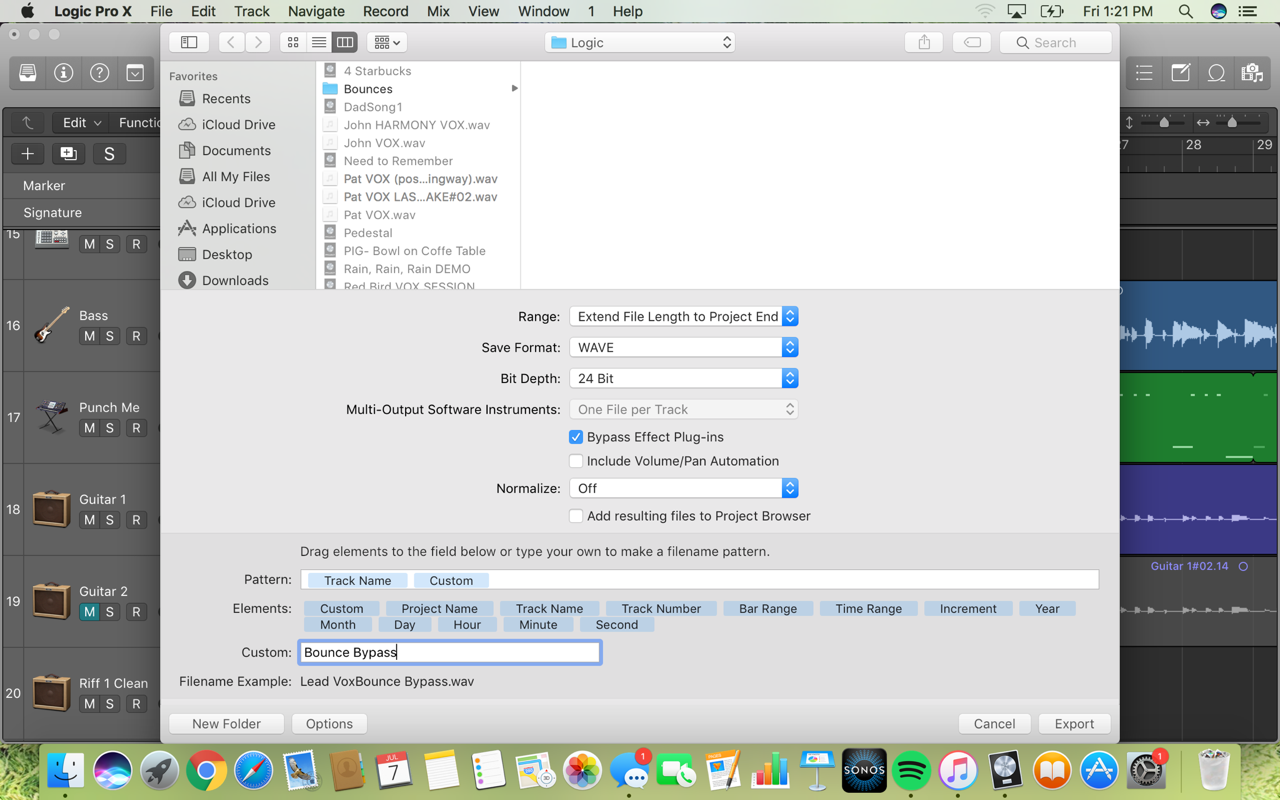 4) Create two folders for the stems to be exported to, labelled “Processed Stems” and “Unprocessed Stems”. Set the format to “WAVE”, the Bit Depth to 24, and normalize to “Off”. Set the naming convention to [Track Name]_[Custom].
5) First, export to the Processed Stems folder. Leave “Bypass Effect Plug-ins” unchecked. Under “Custom:”, write “Processed”.
6) Then export to the Unprocessed Stems folder. Check off “Bypass Effect Plug-ins” and under “Custom:” write “Unprocessed”. The resulting files should look appear, for example: “Bass_Processed.wav” and “Bass_Unprocessed.wav” respectively.
7) If you used Logic’s programmed drum engine, here is a helpful tutorial for exporting stems from that: https://www.youtube.com/watch?v=VckCtr2QelA
8) You’re done! Please put the rough mix, Processed folder, and Unprocessed folder into a clearly labelled master folder with the song’s name and BPM, and send the whole bundle however you prefer!
Exporting From Ableton Live
Make sure to compile the scenes into the arrange view so that it plays through with the timeline that you want. You can do this by recording and performing the song into the arrange view
1) Export your rough mix, so I have an idea of the balances that you’ve been working with. This tells me what parts you consider foreground/background, and will also let me know if I’m either missing any elements or have a stem that shouldn’t be in the mix.
2) Remove all processing from your master fader. If tracks are routed to multiple aux tracks or using parallel compression, remove that routing.
3) Go to File>Export Audio/Video. It’ll bring you to the export window in the screenshot below. Set the “Rendered Track” dropdown to “All Individual Tracks” I ask that you export both processed and unprocessed stems.
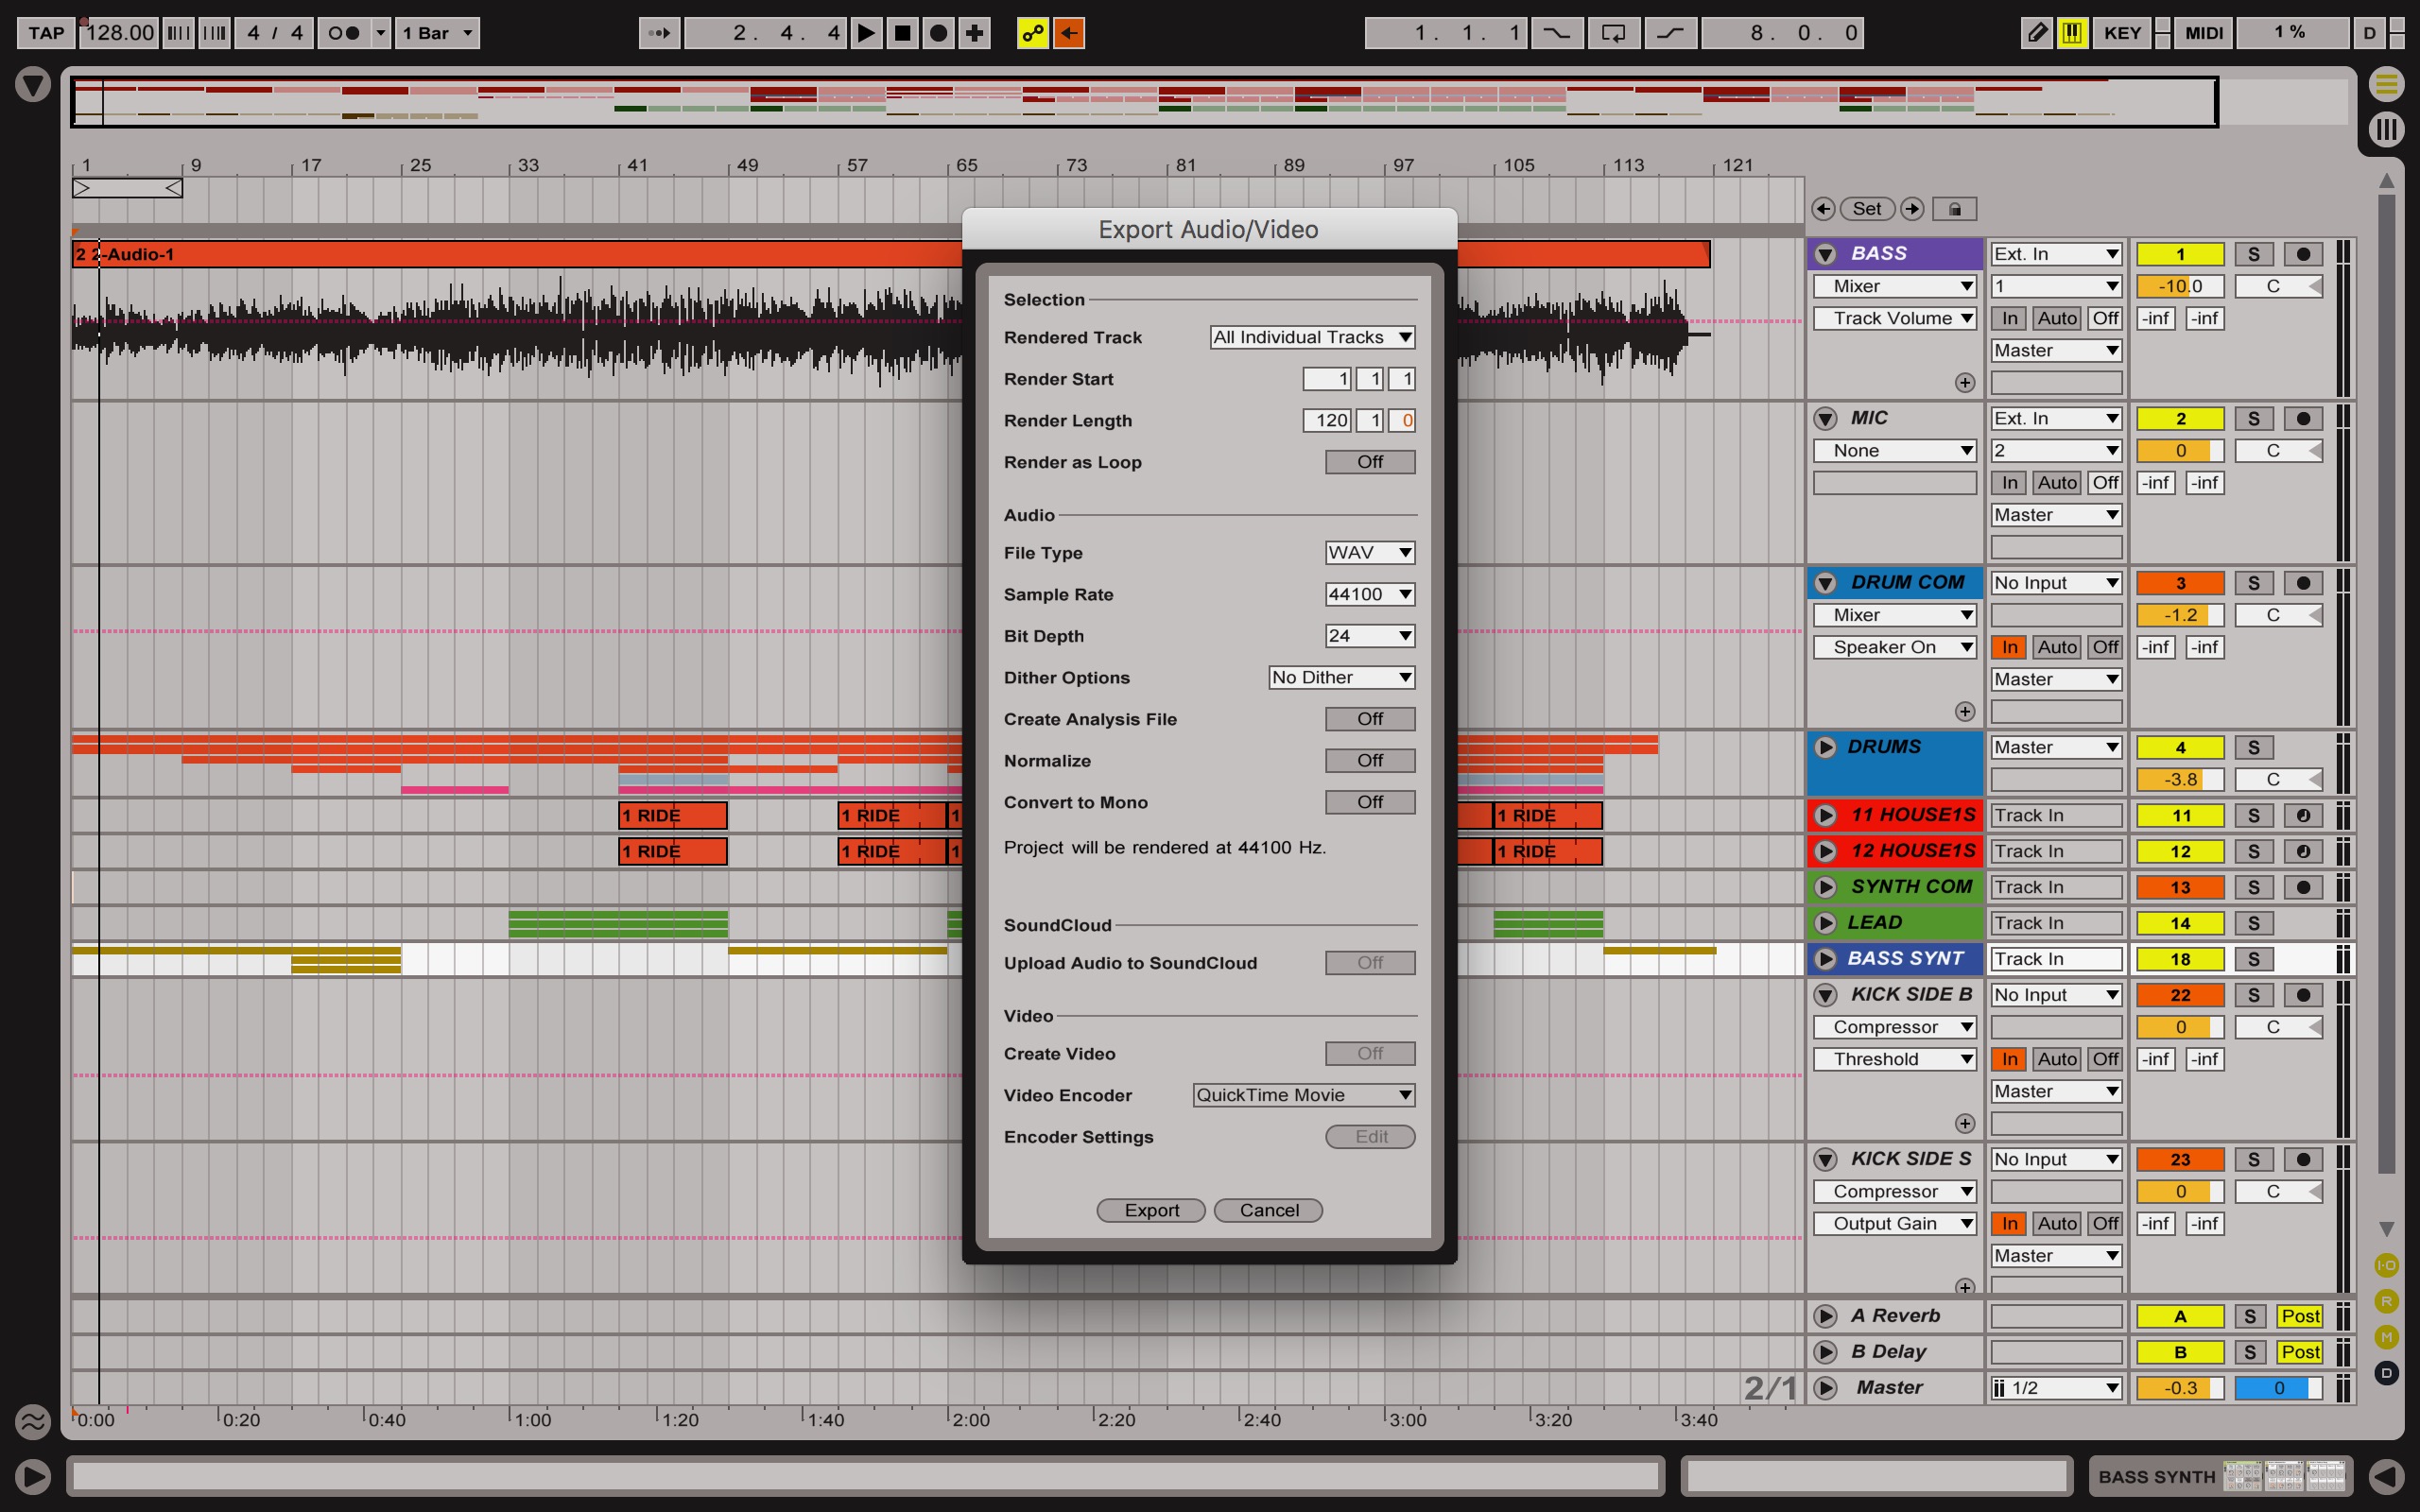
4) Create two folders for the stems to be exported to, labelled “Processed Stems” and “Unprocessed Stems”. Set the format to “WAV”, the Bit Depth to 24, Dither options to “No Dither”, and normalize to “Off”.
5) First, export to the Processed Stems folder.
6) Then export to the Unprocessed Stems folder. Unfortunately in Ableton, bypassing the processing is a manual process. Go through each track and remove all EQ, compression, and effects. Basically, any plugins after the VSTi making the sound. Once all processing is bypassed, repeat steps 3 and 4, and export to the Unprocessed Stems folder.
7) You’re done! Please put the rough mix, Processed folder, and Unprocessed folder into a clearly labelled master folder with the song’s name and BPM, and send the whole bundle however you prefer!